![[CHRISTMAS ECLIPSE GEOMETRY]](12-00-eclipse.gif) |
![[SUN'S LOCATION CHRISTMAS ECLIPSE]](12-00-sun-position.jpg) |
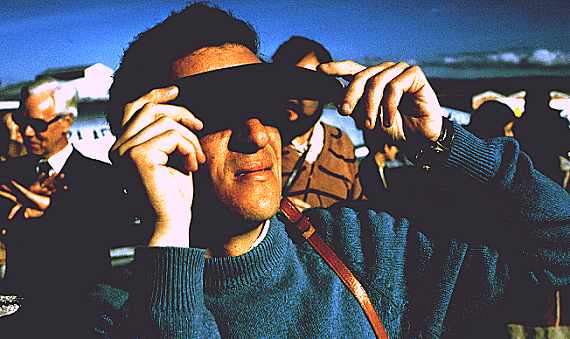
![[WEARING ECLIPSE SHADES]](ledeclipseshades.jpg) |
| Could these people be from Roswell? No, they're the aliens from Dieruff High School's seventh period Astronomy class. Left to Right, O'Neill Alvarez, Matt Distler, Alexandra Dunstan, Jason Jones, Nathan Brown, Sabrina Follweiler, Lucy Lawless, Wanda Rosario, Nick DiBucci (hiding), Ken Eck, Rria Castillo, and Malinda Guadalupe. Gary A. Becker photo... |

SOLAR ECLIPSES AND TRANSITS: WHY THE DANGER?
N E V E R N E V E R N E V E R
or your eyes will become toast!
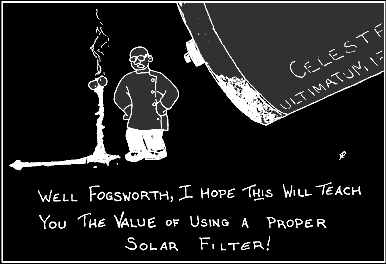
Joseph Rosado's "Fogsworth," Reflector. 44:9 (February, 1994)...
S A F E S O L A R O B S E R V A T I O N S
Viewing a Transit of Mercury or Venus across the sun's disk requires a telescope in addition to safe observing techniques. Proper filtered viewing of the sun with just the eye will not produce an image of the sun large enough for Mercury to be seen.
P R O J E C T I N G T H E S U N ’ S I M A G E
-- CONSTRUCT A SOLAR PINHOLE PROJECTOR --
This will not work for a transit of Mercury or Venus
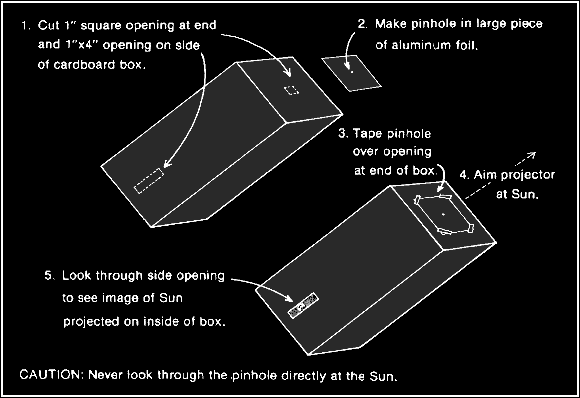
This image was scanned from Bryan Brewer's book Eclipse printed by Snohomish Publishing in 1978.
MATERIALS: A long cardboard tube or preferably a box about three feet in length,
aluminum foil, a large pin, white paper, masking tape or glue, and a single edged
razor blade or razor blade knife...
INSTRUCTIONS: Cut a small rectangular hole about two inches by one inch in the
center of one of the long ends of a rectangular box. Tape or glue
the aluminum foil over this hole. Prick the aluminum foil with a pin to create a
circular aperture. Glue or tape a piece of white paper opposite the pinhole on the inside
of the box. If the box is big enough, observe the sun’s image on the white screen by placing
your head in the box, eyes looking toward the screen. In such cases put the two inch by one inch hole to one side of the the long end of the box. This will allow for more headroom. Point the box so that the pinhole
faces the sun. If the box is smaller or a tube is used, cut an opening in the side
of the tube or box so that the screen can be viewed from the exterior. The length
of the box or projection distance should be about 200 to 500 times the diameter of
the hole. A crisp Ľ-inch diameter hole in a tablet-sized piece of cardboard would
work nicely for an observer standing 4-10 feet away from a white screen, while a
1/8-inch hole would suffice for a 2-5 foot projection box. A one millimeter pinhole
would be sufficient for an 8-20 inch projection distance.
DIFFICULTIES: The images acquired with pinhole projections are neither very sharp nor
very bright. The pinhole solar projector made from a tube is more difficult to use
because it must be pointed at the sun with a higher degree of accuracy. Observations
of the sun with this method do not work well when the sky is hazy. Never try to
observe the sun directly through the pinhole!!!
-- NATURAL SOLAR PINHOLE PROJECTORS --
This will not work for a transit of Mercury or Venus
 |
MATERIALS: Any natural object which produces small holes, such as leaves rustling
in a tree, a white sheet, or white cardboard for use as a projection screen...
INSTRUCTIONS: The myriad "pinholes" which are created as leaves slowly move in a
tree can simultaneously produce thousands of images on the ground. Sunlight shining
through the holes created between crisscrossed fingers will produce nice eclipse
images on a white sheet placed on the ground.
DIFFICULTIES: Images formed by trees will probably be moving and, therefore, more
difficult to follow. The crisscrossed fingers will produce very fuzzy images. These
techniques will not work as well on a hazy day.
--PROJECT THE SUN THROUGH A TELESCOPE OR BINOCULARS--
MATERIALS: A small telescope or inexpensive binoculars with cheap eyepieces, a
projection screen made from white cardboard, and any piece of cardboard that can
be made into a baffle...
INSTRUCTIONS: Use the telescope as an optical projection system by pointing it at the
sun and allowing the sunlight which it collects to pass through an eyepiece and project onto
a piece of white cardboard. Adjust the focuser to sharpen the image. Be sure to shade
the cardboard with a baffle to increase contrast of the image. A solar image about twice
the size of the aperture of the telescope (light gathering diameter of the lens or mirror)
is optimal. If you are using binoculars to project the sun's image, cap one of the sides or
alternate the capped side to prevent heat build up and damage to the optics. For telescopic
projections, minimize the heat build up by keeping all optical surfaces clean. Use a cardboard
stop to reduce the telescopes aperture to two or three inches, and do not keep the instrument
pointed at the sun for periods longer than two minutes. As a matter of safety, make
sure that all finderscopes are either removed or covered and never leave your telescope
unattended.
DIFFICULTIES: Do not try to locate the sun by looking directly through the telescope
or binoculars. Instead, find the sun by manipulating the instrument so that the shadow
of the tube presents the smallest possible surface area on the ground. Cover any
smaller finder scope to prevent others from trying to peek at the sun directly. Use
inexpensive eyepieces with uncemented lenses (Ramsdens or Huygens) to reduce any
eyepiece damage due to excessive heat. You can occasionally cap your instrument and
allow the eyepiece to cool down.

Projecting the sun's image with a refracting telescope.
 |
Michael Stump projects the sun's image with a
reflecting telescope. Gary A. Becker photo...
D I R E C T F I L T E R E D O B S E R V A T I O N S
-- INTRODUCTION --
-- BLACK MYLAR OR ALUMINIZED MYLAR --
This will not work for a transit of Mercury, but astute observers will be able to see Venus
![[WEARING ECLIPSE SHADES]](teachers.jpg) |
| Is this Hollywood? Allentown teachers gathered for a Planetarium sponsored eclipse workshop on December 7, 2000. Gary A. Becker photo... |

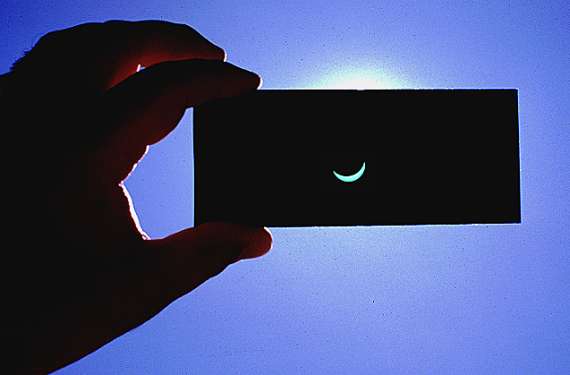
Here is a safe and inexpensive way of observing any partial solar eclipse or Venus transit. The dark Mylar glasses produce a bright yellow image of the sun. The aluminized Mylar (seen above) will provide you with a pleasant blue image of the sun. Both are totally safe for solar viewing. After the eclipse, don't throw them away, because they can be used for future solar eclipses. Eclipse glasses are available from Dan's Camera City, 1439 West Fairmont Street, Allentown, PA 18102. Their cost is $2.50 per glasses, and all proceeds benefit the continued operation of the Allentown School District Planetarium. Contact John Evrard or any of Dan's capable staff for availability of Eclipse/Venus Shades. Phone: 610-434-2313.
-- LARGER SHEETS OF ALUMINIZED MYLAR --
DISCUSSION: These filters consist of two aluminized mylar sheets. When sandwiched
together, they produce a pleasing metallic blue image of the sun which poses no safety
hazards to the eye. Always use two sheets of aluminized mylar. They make excellent
filters for naked eye views of the sun, and when properly secured over the front of a
telescope or binoculars, they allow for safe inspection of the magnified sun at the
eyepiece. Never use these filters at the eyepiece end of a telescope or binoculars.
The mylar will quickly melt from the concentrated amounts of energy that the telescope
is gathering.
AVAILABILITY: Contact Roger W. Tuthill, Inc., 11 Tanglewood Lane, Mountainside,
NJ 07092. Phone: 800-223-1063, 908-232-1786, or Fax: 908-232-3804. Tuthill markets
Mylar in various sized sheets under the name Solar Skreen.
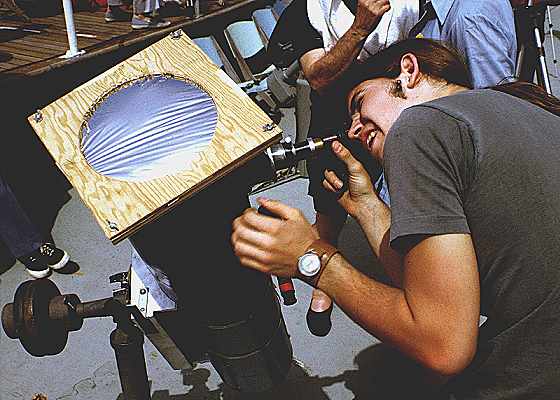 |
Photo by Gary A. Becker, June 30, 1973 African Eclipse
-- #14 WELDER’S SHADE FILTERS --
This will work for a transit of Venus, but not for Mercury
DISCUSSION: Heavy duty, high amperage welding requires a dense enough glass filter
which has also proven extremely safe and popular for viewing the sun. These filters
are not of a high enough optical quality to be used as front end solar filters for
telescopes. In the less expensive varieties, they produce a solar image which is
green. Gold coated #14 Welder’s Shade filters will warm up the solar image to a more
natural color.
AVAILABILITY: Order from J.W.S. Technologies, 1701 East Race St., Allentown, PA 18103.
Phone: (610) 266-1500. The company is located behind Lehigh Valley International Airport near the control tower. These filters are normally not in stock, except for the #14, 4-inch by 5-inch size, green filter, but they can be acquired in about one week. Prices can be found below
the photo.
 |
Composite photo by Allen Seltzer, using a #14 green welder's filter.
| Item Description | Sizes | Price/Unit |
|---|---|---|
| #14 Welder’s Shade | 2-inch by 4-inch | $1.60 |
| #14 Welder’s Shade | 4-inch by 5-inch | $4.05 |
| #14 Gold Welder’s Shade | 2-inch by 4-inch | $5.55 |
| #14 Gold Welder’s Shade | 4-inch by 5-inch | $10.95 |
| Welding Goggles/standard | 2-inch by 4-inch filters | $7.95 |
| Welding Goggles/filter flips | 2-inch by 4-inch filters | $9.95 |
-- KODALITH FILTERS --
This will work for a transit of Venus, but for a transit of Mercury
-- KODALITH FILTERS --
This will work for a transit of Venus, but for a transit of Mercury
DISCUSSION: These filters made from light-saturated Kodak Kodalith Ortho film,
developed with Kodak Kodalith A and B chemicals, produce a pale yellow image of
the sun which is safe and pleasant to view. Kodalith is a silver-based graphic
arts film of extremely high contrast. This film should be exposed to an intense
even light source, such as the sun, for at least one minute. After processing, the film
can be mounted as strips in cardboard to accommodate viewing the sun with both eyes
simultaneously. An even less expensive method is to mount the film in 2-inch by
2-inch cardboard slide mounts. It is advisable for even greater safety to tape
the cardboard mounts over a hole cut in a larger piece of cardboard which will
completely cover the other eye while observing the sun.
AVAILABILITY: Dan’s Camera City, 1439 West Fairmont St., Allentown, PA 18102,
Phone: 610-434-2313 can supply the film, developing chemicals, and mounts for
individuals wanting to make their own filters. Order Kodalith Ortho film, 6556,
Type III, Cat. No. 1686419
 |
A simple, safe, and inexpensive Kodalith solar filter... Photography by Allen Seltzer.
Postcards from the Schoodic Sunrise Eclipse
August 11, 1999
Click on the photos to make them larger.
|
At 5:29 a.m. on August 11, 1999 the individuals on Blueberry Hill on Maine's Schoodic
Peninsula were some of the first individuals in the United States to witness
the eclipsed sun rise from the cold waters of the Atlantic. Clouds from an approaching
low pressure system covered the sky except for a thin sliver of eastern horizon. Exposure--
1/60th sec., F/8, 500mm, KPA-200... Gary A. Becker photo... |
![[.JPG IMAGE]](1999-ecl-thumbnails/99-eclipse1.jpg)
|
![[.JPG IMAGE]](1999-ecl-thumbnails/99-eclipse2.jpg) | The sun rose into a bank of clouds that created spectacular visuals through the lens of my 500mm F/8 fixed focal length lens. A range of exposures were taken at full stop increments starting at 1/2000th of a second to 1/30th second. No solar filter was used because of the attenuation of the sun's light due to the clouds and haze. Exposure 1/60 second, F/8, 500mm, KPA-200... Gary A. Becker photo... |
|
About five minutes after rise, the sun emerged for one last hurrah before disappearing
behind the denser cloud bank visible near the top of the photo. It was near maximum
eclipse at this point, about 91 percent. The 500mm, F/8 exposure at 1/250th of a
second was shot with Prof. Kodachrome 200 film. Gary A. Becker photo... |
![[.JPG IMAGE]](1999-ecl-thumbnails/99-eclipse3.jpg)
|
![[.JPG IMAGE]](1999-ecl-thumbnails/99-old-moon.jpg) | On the morning before the partial solar eclipse, the moon, only 24 hours before its new phase, became visible for about 10 minutes. It was the latest in the 29.5 day lunar cycle that I had ever seen the moon. The time was about 4:50 a.m. A 500mm F/8 fixed focal length Nikkor lens captured the image. The exposure was one second using KPA-200 film. Gary A. Becker photo... |
|
The morning before the partial eclipse, I tested what my computer and compass had
indicated would be an excellent viewing site. The chosen location was Blueberry
Hill on the Schoodic Peninsula near the town of Winter Harbor, Maine. Inclement weather
was predicted for eclipse morning. The time was 4:45 a.m. Gary A. Becker digital... |
![[.JPG IMAGE]](1999-ecl-thumbnails/1416.jpg)
|
![[.JPG IMAGE]](1999-ecl-thumbnails/1468.jpg) | This 4:45 a.m. digital image was taken at the same time as the picture above, only one day later on eclipse morning. The change in sky intensity was certainly a result of the cloud cover and not the eclipse which was underway, but below the horizon. Coastal Maine was deemed the best location for success, since bad weather was approaching from the west. Gary A. Becker digital... |
|
The sun rose over open waters at 5:28 a.m. on August 10, right on target, confirming
Blueberry Hill as an excellent location for photographing the eclipse. This digital
image was taken about five minutes later to emphasize sky conditions and coloration
during a normal sunrise. My tripoded Nikon camera was used to occult the sun.
Gary A. Becker digital... |
![[.JPG IMAGE]](1999-ecl-thumbnails/1425.jpg)
|
![[.JPG IMAGE]](1999-ecl-thumbnails/1481.jpg) | The time was about 5:45 a.m., August 11. Compare this photo with the completely clear sky sunrise on the day before. Before the sun disappeared behind the darker layer of clouds, the 90 percent eclipsed sun had been visible to the naked eye without filtration. The 10 minutes prior to sunrise were actually the most interesting from the perspective of coloration. See below. Gary A. Becker digital... |
|
Five minutes before sunrise on eclipse day the sky lit up in various shades of lavender,
red, and orange. The faces of the two dozen observers, watching the brightening eastern
horizon, glowed pink. Click on any of the photos to make them larger.
Gary A. Becker digital... |
![[.JPG IMAGE]](1999-ecl-thumbnails/1477.jpg)
|
![[.JPG IMAGE]](1999-ecl-thumbnails/1476.jpg) |
This is a close up of the eastern horizon about five minutes before sunrise. The overall
lighting seemed to be less intense than a normal sunrise. The reddening effects were
certainly due partly to the cloud cover. But the nearly eclipsed sun also played a part
too. The sun's temperature near its limb is cooler, and therefore, this light
would appear more red to the eye. It was this redder light that we were seeing when
this picture was taken. Gary A. Becker digital... |
|
This picture further narrows the field of view to what a person looking with binoculars
would have seen 5-10 minutes before sunrise. The redness of the photo was more obvious
than visual observations of the same area.
Gary A. Becker photo... |
![[.JPG IMAGE]](1999-ecl-thumbnails/99-sunrise.jpg)
|
Partial Solar Eclipse of Feb. 26, 1998
|
|
|
![[ECLIPSE 01:55]](0155pm.jpg)
![[ECLIPSE 01:17]](0117pm.jpg)
![[ECLIPSE 12:38]](1238pm.jpg)
The Feb. 26, 1998 solar eclipse from Allentown (right to left): 12:38 p.m., 01:17 p.m., 01:55 p.m.
![]()
 | Back to Eclipse Viewing |